OBS Studio is free, open-source software for recording video and live streaming, and it is used by everyone from first-time YouTubers to professional broadcasters. It can capture your screen, a game, a webcam, a microphone and almost anything else connected to your computer, then mix those ingredients together into one finished video or live broadcast. The price, nothing, and the fact that it runs on Windows, macOS and Linux make it the default starting point for most creators, but the first launch can feel overwhelming: panels everywhere, unfamiliar words like "scenes" and "encoders", and a preview window that starts out completely black. This guide walks through the whole thing slowly, in the order you actually need it. By the end you will know how to install OBS Studio 33.0.1, build a simple scene, record a video, and understand enough about streaming and settings to keep learning without getting stuck.
What OBS Studio is and what it can do
OBS Studio, short for Open Broadcaster Software Studio, is a free and open-source application for video recording and live streaming, released under the GPLv2 licence or later. It is developed by the OBS Project and maintained openly, which means anyone can inspect the code and the community contributes features, fixes and plugins. The latest version at the time of writing is OBS Studio 33.0.1, released on October 29, 2026. It runs on Windows 10 and 11, on macOS 13.0 or newer, and on Linux, where the exact requirements vary by distribution. Because it is free, there is no trial period, no watermark and no locked feature, the recording and streaming tools are the same for every user from the first install.
At its core, OBS does two jobs. The first is recording: it captures video and audio from your computer and saves the result as a video file on your disk, which you can edit or upload afterwards. The second is streaming: it sends that same mixed picture live to a platform such as YouTube or Twitch while you are still creating it. Both jobs use the same scenes and sources, so learning to record also teaches you most of what you need to stream. Creators use OBS for tutorials, gameplay videos, online lessons, webinars, podcasts with video, software demonstrations, and live events, essentially any situation where the picture needs to combine a screen, a camera, or both, with clean audio.
Downloading and installing OBS Studio
Always get OBS Studio from the official OBS Project sources. The download links on this site point directly to official distribution files, and the project also publishes releases on its own website and on GitHub. For most Windows users the simplest choice is the Windows x64 installer, a 178.0 MB.exe file. If you use a Windows computer with an ARM64 processor, the release is a.zip archive rather than an installer, so you extract it and run OBS from the extracted folder. macOS users choose between an Apple Silicon.dmg and an Intel.dmg, and Ubuntu users on version 26.04 can use the official.deb package. Pick the file that matches your operating system and processor, and ignore any third-party site offering a "faster" or "cracked" copy, unofficial downloads are the most common way beginners end up with unwanted software.
Installation itself is straightforward on every platform, but a few details are worth getting right. On Windows, run the installer and accept the defaults unless you have a reason to change the install location; OBS needs permission to install, so approve the prompt when it appears. On macOS, open the.dmg and drag OBS into your Applications folder, then launch it from there, if macOS warns that the app is from an identified developer, that is the normal Gatekeeper check and you can open it from the Applications folder. On Linux, install the package with your distribution's package manager or software centre. If you want the full platform-by-platform walkthrough, see our guide on downloading OBS for Windows and, after downloading, the Windows 11 installation guide.
Your first look at the OBS interface
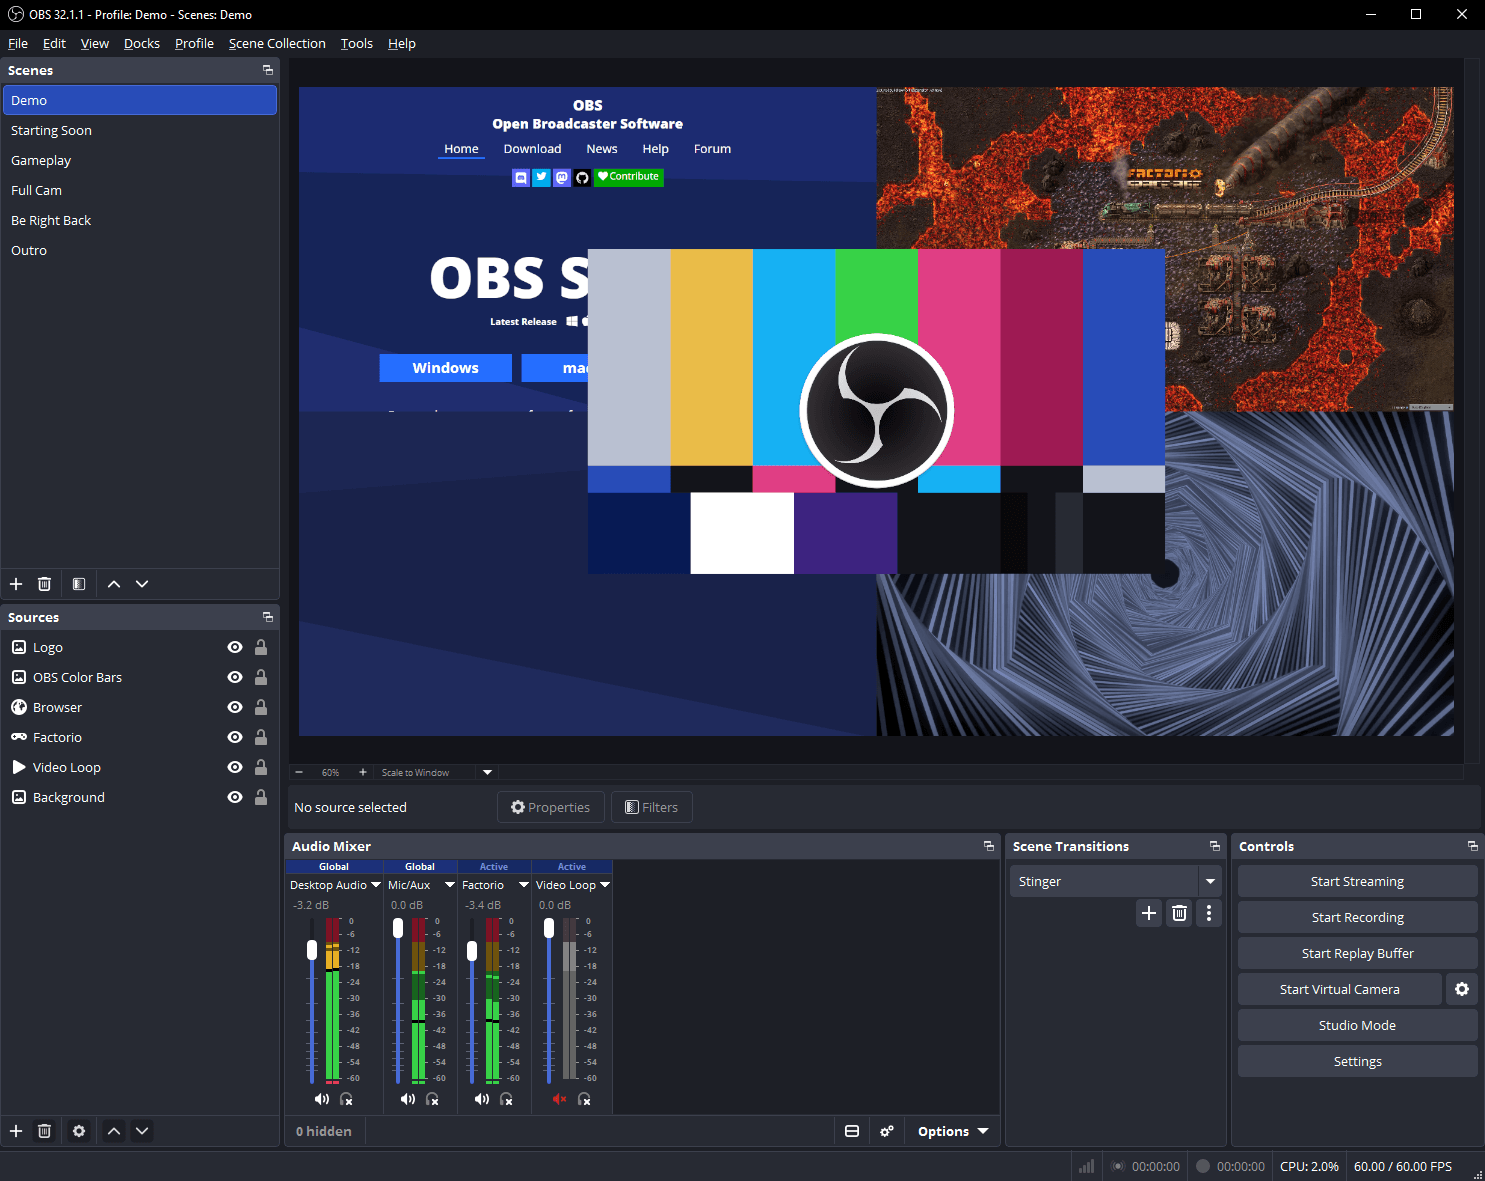
The main OBS window is divided into a few panels, and each one has a single job. At the top centre is the preview: a large black rectangle that shows exactly what your audience would see. When you have not added any sources yet, it stays black, which is normal and is the first thing that confuses new users. Below the preview is the Scenes panel on the left and the Sources panel next to it. To the right is the Audio Mixer, which shows a volume meter for each audio source. At the bottom right are the controls: Start Streaming, Start Recording, Start Virtual Camera, Studio Mode and Settings, plus a small status bar showing how long you have been recording or streaming and how much data is moving.
Scenes and sources explained
A scene is a saved arrangement of sources, and a source is one thing OBS captures or displays. Think of a scene as a camera shot: one scene might show your full screen with a small webcam in the corner, another might show only your webcam, and a third might show a "starting soon" image. Switching scenes changes the whole picture at once, which is how streamers move smoothly between a game, a chat screen and a break screen. You can create as many scenes as you like, and each scene keeps its own list of sources. A source can also be reused in more than one scene, so your webcam can appear in several shots without being added from scratch each time.
Making your first recording
Recording in OBS is deliberately simple once a scene exists. First, build the scene you want to record and check the preview: is the right window visible, is the webcam where you want it, and is nothing private, such as notifications or an open email tab, showing on screen? Second, decide where recordings will be saved by opening Settings, then Output, and checking the Recording Path. Pick a folder with plenty of free space, because video files are large, and note the recording format: MKV is a safe choice while you are learning because it survives a crash better than MP4, and you can remux it to MP4 later from the File menu if your editor prefers that format.
When you are ready, the steps are short:
- Open OBS and select the scene you want to record.
- Speak a short test sentence and watch the Audio Mixer, the microphone meter should move into the green and yellow range, not sit flat or slam into red.
- Click Start Recording at the bottom right. The button changes to Stop Recording, and a timer appears in the status bar.
- Do the thing you want to capture, present, play, demonstrate, without worrying about small mistakes; you can edit later.
- Click Stop Recording. OBS saves the file to your Recording Path and shows the location in the File menu under Show Recordings.
For capture types and quality choices in more detail, see our guide to recording your screen with OBS and the best OBS recording settings guide, which covers starting points for resolution, frame rate and bitrate.
Setting up your first stream
Streaming adds one ingredient to recording: a destination. OBS sends your mixed scene to a streaming platform, and the platform shows it to viewers. To set that up, open Settings, then Stream, choose your service, for example YouTube or Twitch, and connect your account or paste in a stream key from the platform. A stream key is a private password for your channel: never share it, never show it on screen, and regenerate it on the platform if you think it has leaked. Connecting an account is usually easier than pasting a key, because OBS can handle the login for you, but either method works and both can be changed later.
Before your first real stream, do a private test. Most platforms offer an unlisted or private test stream, or you can stream to a test account, and that is the safe way to learn. Run the Auto-Configuration Wizard for streaming if you have not already, then follow these steps:
- Choose the scene your viewers should see first, such as a starting screen or your main scene.
- Check audio levels in the mixer while speaking and playing any sound your stream will include.
- Click Start Streaming and watch the status bar: a stable green connection indicator and a steady bitrate are good signs.
- Open your own stream on a second device or in a browser, muted, and confirm the picture and sound look right.
- End the test, review what you saw, fix any issue, and only then announce a real stream.
Settings worth checking before you record or stream
Most OBS settings can stay at their defaults while you are learning, but a handful are worth understanding early. In Settings, under Video, the Base Resolution should match your monitor and the Output Resolution is the size of the recorded or streamed picture; setting the output lower than the base downscales the picture, which is how many people record a 1080p screen at 720p for smaller files. The frame rate, commonly 30 or 60 frames per second, controls smoothness: 30 is fine for talking-head videos and presentations, while 60 suits fast movement such as gameplay. Under Output, the encoder does the heavy work of compressing video; hardware encoders use your graphics card and software encoders use your processor, and the best choice depends on your machine, so the Auto-Configuration Wizard's suggestion is a good starting point.
Common mistakes
The most common beginner mistake is pressing record with an empty or wrong scene, a black preview means a black recording, so always look at the preview first. The second is forgetting audio: a microphone that is muted in the mixer, a desktop audio source capturing the wrong output, or headphones plugged in after OBS started can all produce a silent video. Speak a test sentence and watch the meters every time. Third, many beginners add a Display Capture and a Window Capture of the same thing in one scene, which creates a doubled or flickering picture; use one capture source per scene unless you understand layering. Fourth, recording in MP4 and losing the whole file when the computer crashes or the power fails, MKV avoids most of that risk. Fifth, trying to copy a popular streamer's settings exactly: their hardware, encoder and connection are different, so their bitrate or resolution may overload your machine. Start with the wizard's suggestions, test, and adjust one setting at a time.
Troubleshooting
When something goes wrong, work through the problem in order: scene, source, audio, settings, then system. If the preview is black, check that the scene has a source, that the source is not hidden with the eye icon, and that the source is capturing the right monitor or window, on Windows, a black Display Capture is often a graphics setting issue, and our guide to fixing OBS recording problems walks through the common causes. If the recording has no sound, check the mixer first: is the microphone meter moving, is the track muted, and is the right device selected in Settings, then Audio? If the video stutters, lower the output resolution or frame rate, close heavy applications, and check whether your encoder is overloaded, the status bar and the Stats window under View show dropped frames and encoding load.
Frequently asked questions
Is OBS Studio really free?
Yes. OBS Studio is free and open-source software, released under the GPLv2 licence or later. There is no paid version, no watermark and no feature locked behind payment. You can download it from the official OBS Project sources and use it for recording and streaming without paying anything.
Do I need a powerful computer to use OBS?
It depends on what you are doing. A simple screen recording with voiceover needs far less than a high-resolution game stream. OBS does not publish a single minimum processor or memory figure for everyone, because requirements depend on workload and encoder. Run the Auto-Configuration Wizard, start with modest settings, and raise them only if your computer handles them smoothly.
Can I record and stream at the same time?
Yes. OBS can record a local file while streaming to a platform, using the same scene. That is a useful way to keep a high-quality copy of a live session for later editing or upload. Recording while streaming does use more system resources, so test it on your machine before relying on it for an important broadcast.
Why is my OBS preview black?
A black preview almost always means the scene has no visible source, the source is hidden, or the source is capturing the wrong monitor, window or game. Check the Sources panel, make sure the eye icon is on, and confirm the source settings point at the thing you want to show. If the source is a Display Capture on Windows and still shows black, check the graphics settings covered in the recording-problems guide linked above.
Where does OBS save my recordings?
OBS saves recordings to the Recording Path shown in Settings, then Output. The default is usually a folder inside your user Videos folder, but you can change it to any drive with enough free space. You can open the folder quickly from the File menu by choosing Show Recordings.
Conclusion
Learning OBS Studio is mostly about learning three ideas: scenes hold sources, sources are the ingredients of your picture, and the preview shows exactly what your audience will see. Install the official release, run the Auto-Configuration Wizard, build one simple scene with a screen capture and a microphone, and make a short test recording. Watch it back, fix the one thing that bothers you most, and repeat. That loop, record, review, adjust one setting, teaches OBS faster than reading every menu in advance, and it keeps you from getting lost in advanced features before the basics work. Once a clean recording feels routine, add a webcam, try a second scene, and then attempt a short test stream. OBS rewards that steady, practical approach, and because it is free and open-source, you can keep experimenting without spending anything while your skills grow.